The Essential Guide to Historic Plaster Repair: Preserving Walls and Preventing Collapse
Plaster-on-lath construction, common in homes built before the 1940s, offers superior sound dampening and fire resistance compared to modern drywall. However, due to structural shifting, moisture, and age, plaster can crack, bubble, or detach from its wooden lath backing. Repairing plaster is a specialized skill that prioritizes **restoration** over demolition. This guide provides a systematic approach to identifying damage and executing professional-grade repairs.
Contents Overview
Phase 1: Assessment and Diagnosis
Before mixing any material, you must determine the extent and type of damage. Plaster damage typically falls into two categories: superficial cracking or structural detachment.
1. Listening for Detachment
The most crucial step is checking for "keys" that have broken. The 'keys' are the blobs of plaster that squish through the lath openings, curing behind the lath to lock the wall in place. When keys fail, the plaster pulls away from the wall structure.
- Method: Gently tap the wall surface with a knuckle or the handle of a screwdriver.
- Sound Diagnosis: A solid wall will produce a **dull thud**. If the plaster is detached, the sound will be a distinct, **hollow drumming or rattle**. This area must be re-secured immediately.
2. Identifying Crack Types
The type of crack determines the repair method:
- Hairline Cracks: Usually cosmetic and due to surface drying or minor seasonal shifts. Easily fixed with setting compound.
- Spiderweb/Alligator Cracks: Indicate a failing paint layer or an underlying moisture issue. Requires scraping and skim coating.
- Structural/Long Diagonal Cracks: Often signal a major house foundation shift or framing movement. These require re-securing the surrounding loose plaster before filling the crack itself.
Plaster vs. Drywall Repair
Unlike drywall, which uses joint compound (mud) and paper tape for repairs, plaster requires a product with strength, flexibility, and proper adhesion, such as a **setting-type joint compound** (e.g., Durabond) or specialized **patching plaster**. Traditional mud takes too long to dry and lacks the necessary structural integrity for thick, multi-layer applications.
Phase 2: Re-Securing Loose Plaster (The Critical Step)
If the plaster rattles or feels spongy, you must reattach it to the lath using a technique known as "plaster buttoning" or injection before filling any cracks.
1. Preparing the Loose Area
Use blue painter's tape to mark the boundary of the loose section. Drill small, shallow holes (1/8 inch or 3mm) through the plaster layer, ensuring the drill bit does not splinter the lath behind it. These holes should be placed every 2–3 inches across the loose section.
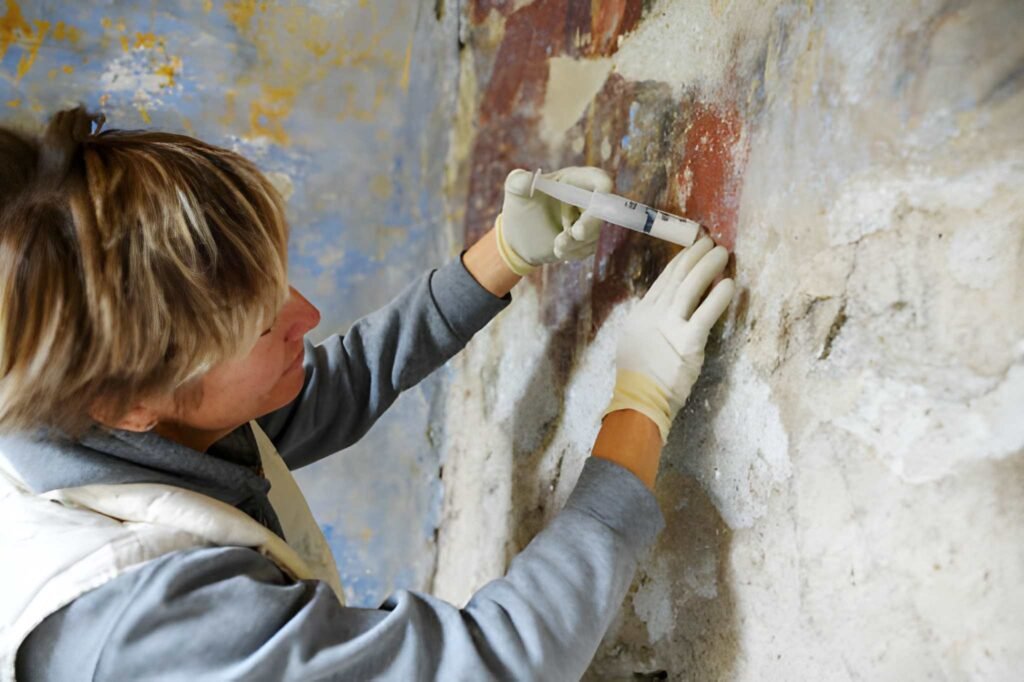
2. Bonding Agent Application
Before injecting plaster, you need a primer. Inject a specialized liquid plaster **bonding agent** into the drilled holes using a syringe or a small squeeze bottle. This agent soaks the back of the plaster and the lath, ensuring the new plaster adheres firmly. Allow the bonding agent to become tacky according to the manufacturer's instructions (usually 15-30 minutes).
3. Installing Plaster Buttons
While still tacky, drive specialized **plaster washers** (often called 'plaster buttons') or large-headed screws through the drilled holes and into the lath. Gently tighten the screws until the plaster is snug against the lath, but be careful not to overtighten and crack the plaster surface. These act as temporary clamps and permanent anchor points, forcing the loose plaster back against the lath.
4. Finishing the Surface
Once secured, remove the screws/buttons if they are temporary, or use a setting-type joint compound to fill the washer depressions and surrounding cracks. Apply a fiberglass mesh tape over major crack lines, then skim coat the entire section to blend the repair with the existing wall texture.
Phase 3: Repairing Cracks and Hairlines
For cracks that are purely structural (i.e., the surrounding plaster is not loose), the focus shifts to creating a durable, flexible, and aesthetic filler.
1. Creating the V-Groove
Do not simply fill a narrow crack. Use a utility knife or a specialized crack-cleaning tool to **widen the crack into a shallow 'V' shape** (V-groove). This exponentially increases the surface area for the new plaster to bond, ensuring the filler won't pop out when the wall expands and contracts.
2. Applying the Filler
For fine cracks (under 1/8 inch), use a flexible sealant or a high-quality spackling paste. For medium cracks, use a setting-type joint compound. Press the compound firmly into the V-groove using a flexible putty knife, ensuring no air voids remain. Remove all excess material, leaving the repair slightly proud of the surface.
3. Skim Coating and Feathering
Allow the V-groove filler to dry. Apply a very thin, broad coat of skim coat compound over the entire crack area using a 6-inch or 10-inch joint knife. The goal is to feather the edges out onto the existing wall surface so the repair blends seamlessly. Multiple thin coats are always better than one thick coat.
Phase 4: Patching Large Holes and Voids
Repairing a large hole (more than 6 inches across) requires creating a new structural backing before applying new plaster.
1. Preparing the Lath
Cut away any damaged or loose plaster until you reach solid material all around the perimeter. If the original wood lath is exposed and damaged, remove the damaged lath pieces and screw new, clean pieces of wood lath (or metal mesh lath for a superior patch) into the framing studs behind the hole.
2. Layered Plaster Application (Three Coats)
Traditional plaster application requires three distinct coats to achieve strength and a smooth finish:
- Scratch Coat: This is the base coat. Mix a strong patching plaster with a high sand content (or use a plaster specifically labeled for the scratch coat). Apply it aggressively, scratching the surface with a piece of wood or trowel teeth while it's still wet. This rough texture creates the necessary mechanical bond for the next layer.
- Brown Coat (or Second Coat): Once the scratch coat cures (24+ hours), apply the brown coat. This coat is used to bring the patch nearly flush with the existing wall surface. Use a straight edge (like a 2x4) to ensure the patch surface is perfectly planar.
- Finish Coat (or Skim Coat): Apply a thin layer of fine-grain finish plaster or high-quality joint compound to match the wall's final texture. This is the coat that must be perfectly smooth before sanding.
Essential Plaster Repair Toolkit
A list of non-negotiable tools for tackling plaster repair tasks.
| Tool | Purpose |
|---|---|
| Utility Knife / V-Groove Tool | Widen cracks for better adhesion. |
| Plaster Washers / Buttons | Mechanically clamp loose plaster back to the lath. |
| Fiberglass Mesh Tape | Reinforce crack repairs; superior to paper tape on plaster. |
| Setting-Type Joint Compound (e.g., Durabond 45/90) | The preferred filler and skim-coat material due to its strength and fast drying. |
| Trowel & Joint Knives (4", 6", 10") | Mixing materials, applying filler, and feathering the final skim coat. |
Interactive Tool: Plaster Material Estimator
Use this tool to estimate the volume of mixed setting compound needed for a large hole patch, helping you determine how much dry powder to mix.
Hole Volume Estimator for Plaster
This calculates the volume in cubic inches for a rectangular patch area, assuming a typical 3/4 inch plaster depth.
Conclusion
Plaster repair is an art that preserves the character of older homes. By prioritizing the re-attachment of loose sections and using the correct materials—specifically setting-type compounds and lath reinforcement—you can ensure your walls remain sound for decades to come. Patience, precision, and multiple thin coats are the keys to a successful, invisible repair.


